Microsoft Lists helps you organize, collaborate, and share the information you care about. Create and share lists that help you track issues, assets, routines, contacts, inventory, and more.
Starting from the Lists app in Microsoft 365, you can quickly create a list from scratch or get inspired by ready-made templates. View your recent and favorite lists no matter where they're stored, and add more favorites to get back to them quickly.
This article provides a summary of the List application:
- View recent and favourites lists
- Create a new list
- Search for a list
- Share a list
- Rename a list or icon and colour
- Add or delete a column.
For more information on Lists, see Microsoft Training Documentation or Video: How to Create a Microsoft List.
Access Lists
Access to lists is provided through your web browser. To navigate to this application, follow these steps:
- Click this link and log in (if not already logged in).
- Click on "All Apps).

- Click on "Lists" in the list of applications.
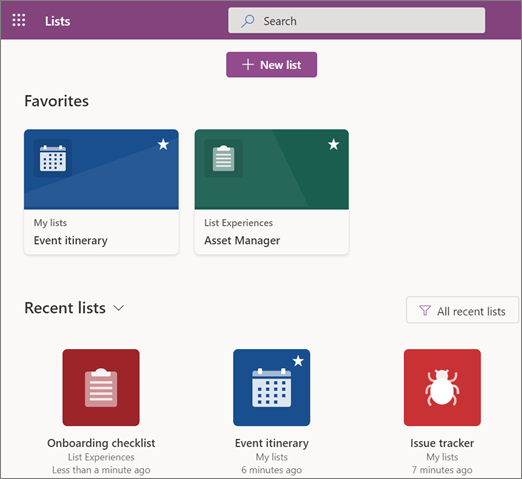
View your recent and favorite lists
The Lists app gives you easy access to your recently visited and favorite lists. Your Favorites appear at the top, followed by the Recent lists section.
-
To add to or remove a favorite from your Favorites section, select the star icon in the upper corner of any list.
-
Recent lists shows all the lists you recently visited, regardless of who created them or where they're stored. Recent lists includes lists that you've visited on SharePoint sites or Microsoft Teams that you're a member of.
-
To see only your recent personal lists that you created in My lists, select the arrow next to the Recent lists heading, and then select the My lists view.
-
To see only the recent lists that you created, including in My lists, SharePoint, or Teams, select the All recent lists filter control to the right of the heading, and then select Recent lists I created.
-
To reset the filters or view selection, just refresh your browser. The page defaults back to the original settings when you leave the page and come back.
Note: There's a 100-item limit for Recent lists and a 30-item limit for Favorites. If you reach either limit, you'll get an error and you can remove items to add more.
Create a new list
Create a list from scratch, from an Excel spreadsheet, from an existing list, or from one of the ready-made templates.
-
From the Lists app, select Create new at the top of the page.
-
From the Create a list page, select one of the following options:

-
List: Choose this option to start from scratch. Give your list a Name, Description (optional), and select any other options you want. The list will save to My lists unless you choose one of your SharePoint sites or Teams from the Save to list. When you're finished selecting options, select Create. Learn more about how to Create a list from scratch.
-
Import from Excel: Choose this option to Create a list based on an Excel spreadsheet.
-
Import from existing list: Choose this option to save time and create a new list based on the columns in another list. Your new list will start with all the same columns, but it won't include any of the data from the original list.
-
Templates: Select a template, such as Issue tracker, to see what columns the template contains and scroll through sample data to see what it looks like. Select other templates to look at other ones. If you find one you like, select Use template. Learn more about how to create a list from a template or about the list templates in Microsoft 365.
-
When your list opens, to add room for more types of information to the list, select + or + Add column.
Read more about how to add a column or delete a column.
When you're ready, you can edit the view of a list. If you no longer need a list, you can delete it.
Search for lists
Having trouble finding a list? Type the key words in the Search box at the top of the page. Your results will include all the lists matching that query that you have access to in your organization.
Share a list
-
From the home page of the Lists app, point to a list, select Open actions (...), and then select Share.
(If you already opened your list, just select Share near the top of the page.)
-
Enter a name or email address.
-
To change the access permissions you are granting to people, select Can edit and then select a different option.
-
If you don't want to let people know you're sharing the list, clear the Notify people check box.
-
Select Grant access.
Notes:
- You need to have Full Control access to the list to be able to share a list. If you don't have permission to share, you'll see a message stating that fact when you try to share it.
- For more info about sharing lists, see Share a list or list item.
Rename a list, or change the color or icon
-
From the home page of the Lists app, point to a list, select Open actions (...), and then select Customize.
-
Enter a new Name.
-
You can also choose a new color or a different icon, if you want.
-
Select Save.
Tip: To change the name of your list from the list page, select its title, type a new name, and then select Save.
Add or Delete a column
- Read more about how to add a column or delete a column.